

Holley carburetors are sometimes known for flooding over in the event that a float sticks or sinks or debris contaminates the needle & seat, which prevents the needle & seat from fully sealing closed and shutting off the fuel flow when the float bowl is full. In severe instances this causes fuel to erupt directly from the float bowl vent tubes on the main body, but sometimes the problem is not as pronounced, which can make diagnosis a little more difficult. If the float sinks, the carb will require disassembly and the float will need to be replaced. However, more often than not the problem is simply a contaminated needle & seat, and the fix is merely a matter of removing the assembly, cleaning it of any obstructions, then reinstalling the assembly. Note that you do not necessarily need to remove the float bowls to perform these repairs, but it’s not a bad idea to remove them since it makes it considerably easier to re-baseline your float settings.
To print a copy of this aticle or save a copy for reference please click on this link: Holley Needle and Seat PDF.
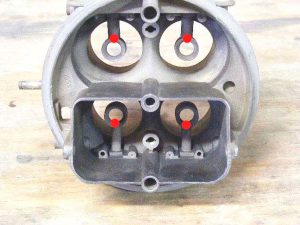
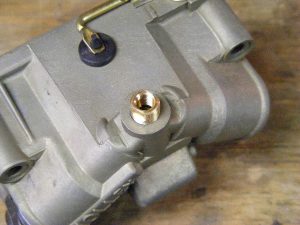
If your carburetor is flooding over but it is not coming from the bowl vents, the first thing to do is to check to see if there is fuel draining from the boosters with the engine off. The boosters are noted by the red dots in the picture below. If you see fuel draining from the boosters with the engine off, either the float level is too high, or there is debris in the needle & seat preventing it from closing.
Often times fuel will dribble from either end of either throttle shaft as the fuel drains from the booster and runs down the sides of the shaft. If you see fuel dribbling from these locations, chances are you’ve found your problem. Note that if you see a drip on the primary side, check the primary needle & seat, and likewise for a leak on the secondary side.

If you’ve removed the float bowl(s) from the carb to check for problems, the first thing to check is that the floats operate freely. They should pivot up & down with no sticking or “catch” spots. The float should pivot on its own merely by inverting the bowl.
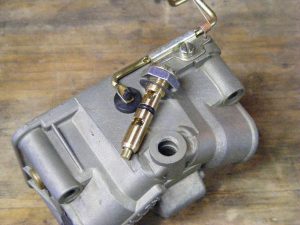
To remove the needle & seat, place a 5/8″ wrench on the adjuster nut to hold it in place and loosen the set screw with a large flat blade screwdriver by turning the screw counter-clockwise. You may remove the screw completely if you wish, but it’s not necessary at this point.

With the set screw loosened, turn the adjuster nut counter-clockwise to thread the needle & seat up out of the float bowl. It will only come up about 3/8″ before the threads disengage, but the o-ring will still be providing some resistance. Once the threads are disengaged, gently pull the needle & seat from the bowl.
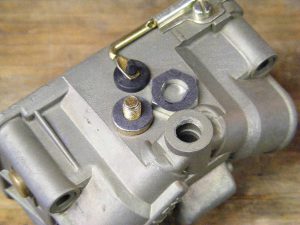
Here is the set screw with the small gasket, and the adjuster nut with the large gasket.
Be sure you don’t lose those gaskets!
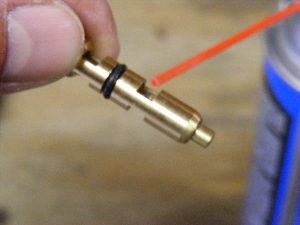
The top square “window” is where fuel enters the needle & seat, and the lower window is where the fuel exits the needle & seat into the float bowl. It’s a little tough to see in the picture, but there is a small rubber point on the top of the needle which seals against the small hole above it. This is where the problem is. Look for any obvious debris here and remove as necessary.

Before reinstalling the needle & seat, a good blast of carb cleaner is highly recommended. Lastly, check that the needle operates freely & smoothly before reinstalling the unit. If it sticks, replace the needle & seat with a new one.
A few drops of light oil on the needle & seat and the o-ring helps ensure a smooth reassembly and helps prevent damage to the o-ring.

Carefully place the needle & seat back into the float bowl taking care not to damage the o-ring as it slides in. Push it down just until the threads are ready to meet.
Next, place the larger gasket in place. This gasket seals the bottom of the adjuster nut to the top of the float bowl boss.
Next, place the adjuster nut on to the needle & seat. Note that there are two corresponding “flats” machined into both the nut and the needle & seat. Make sure they engage properly.
Now place the smaller gasket in place on top of the adjuster nut. This gasket seals the lock screw & adjuster nut. Alternately, you can place the gasket directly over the lock screw if you prefer.

Thread the lock screw down into the needle & seat 1 or 2 turns, but no more. This is what the assembly should look like before you make your baseline adjustments. To make the baseline adjustments, invert the bowl and turn ONLY the adjuster nut in a clockwise direction until you see the float beginning to rise in the bowl.

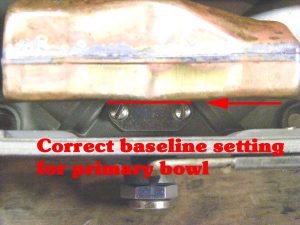
This is the correct baseline setting for a typical primary float. Notice the actual top of the float is even with the bottom of the float hanger mounting screws as evidenced by the red witness line.
This is the correct baseline setting for a typical Holley secondary float. Note that the float is set slightly lower as compared to the primary as evidenced by the red witness lines. An easy way to set this is to adjust the secondary float to the same position as the primary, then give the adjuster nut another 1/2 turn down.

NOTE: As mentioned above, it is not absolutely necessary to remove the float bowls to perform these repairs, but it does make it easier for an inexperienced mechanic to get the baseline float settings dialed in. If you would rather not remove the float bowls, note that once you have loosened the set screws as described above, go ahead and remove the screw completely (again, make sure you don’t lose those gaskets!) and make a note of how far down the needle & seat is inside the recess on the adjuster nut. When you reassemble the needle & seat, simply adjust them back to where they were previously (this is obviously far less precice). As a final alternative, you can simply thread the needle & seats back into the float bowls using only the adjuster nuts until there are approximately 2 full threads visibly showing above the secondary bowl and approximately 3 full threads showing on the primary bowl. Again, these are only ballpark adjustments, and they will require further refinement.
To print a copy of this aticle or save a copy for reference please click on this link: Holley Needle and Seat PDF.